IP deny managed in cPanel


Now, if you are looking for a tutorial that will teach you to use the IP deny managed in cPanel, you are looking at the right article. This article will guide you through the entire process through a series of easy steps. However, let us first learn what cPanel is all about. This is fantastic software with plenty of good features that an ideal software is meant to have. The interface of this particular software is loaded with graphically automated tools. These tools help the users go through their business operations smoothly and allow them to manage the servers without facing any problems.

IP deny managed in cPanel: Since you are reading this tutorial, it can be assumed that you already know how to log in to cPanel and that you are logged in.

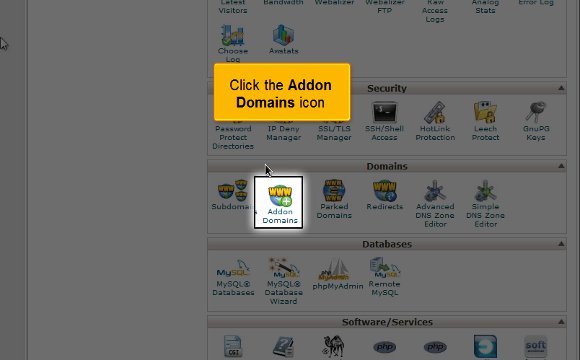
1) Firstly, you must locate an option called IP deny manager; once you have found it, you must click on it.

ip deny manager IP deny managed in cPanel

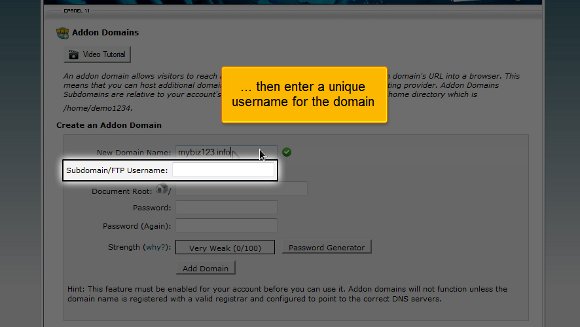
2) After that, you must fill in the IP address you wish to block(IP deny managed in cPanel) and click the option Add. At this stage, you have successfully blocked anyone who uses that particular IP address. You even have a list of all the IP addresses you have managed to secure.

ip deny manager

3) IP deny managed in cPanel: Now you must look for an unblock option to clear any IP address.

ip deny manager

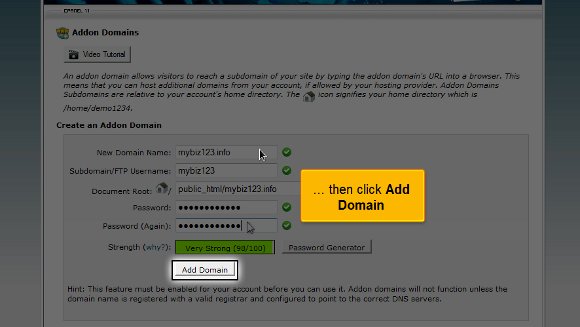
4) IP denial managed in cPanel: You must confirm by clicking on Remove IP. After this, the particular IP address has been removed from the block list forever.

ip deny manager

This brings us to the end of the tutorial that will teach you to use the IP deny managed in cPanel. So, at this point, you have all the knowledge to block any IP address from accessing your website. So now you can simply visit the interface on your cPanel and start going through all the features immediately. You can get started by accessing the shopping carts and multiple domains, configuring your emails and accessing the databases.

You must also know how to log out; this should not be tough. You simply have to locate the log-out tab and click on it. It is not too difficult to operate the various features on cPanel; all you need is patience to absorb what the software offers. You do not need to rush the learning phase as it is essential, and you can learn many things. In fact, you can take the time to learn and pick up items at your own pace. It would be wise to have a relaxed approach towards things; this will help you in ways you cannot even imagine. You are free to look at other tutorials, but remember, if you are new to this, you will take time to adjust to the software’s features.

Setup a cron job in cPanel


How To Setup a Cron Job in cPanel

This tutorial perfectly teaches you to set up a cron job in cPanel. This tutorial has all the steps for you to understand correctly. There is no technicality involved in it. Now, tho, if you are unfamiliar with cPanel, you must know that this software is quite helpful in facilitating business operations. The interface of this software is quite user-friendly and is packed with loads of features that help the users look after their servers.

  1. Setup a cron job in cPanel: First, you must find the Icon that states Cron jobs and then simply click on it.
Setup a cron job in cPanel

2) Setup a cron job in cPanel: After that, you must fill in the email address you wish the cron job outcomes to be sent every time it runs. Here, you must also define the exact procedure and how often you want the cron to be implemented. All the fields will be filled automatically if you choose a standard setting. You will also have a better understanding of each individual field.

cronjob
cronjob

3) Setup a cron job in cPanel: Choose the option once in a week

cronjob

4) Setup a cron job in cPanel: After that, you must enter a particular command of any script you wish to implement, including the path.

cronjob

5) Setup a cron job in cPanel: When you are fully ready, you must click on Add a new cron job

cronjob

After you have completed the above steps successfully, the cron job has been implemented and is visible here. Here, you can create additional cron jobs or even delete certain existing ones.

cronjob

We have ended the tutorial, and you have the knowledge to set up a cron job in cPanel. After this, you can go back to the interface and review the other features. Logging out of the interface is probably one of the easiest things to do. So, by now, you have realized that the tips mentioned in the tutorial are not that tough to follow. With patience, you can easily understand what the software offers you. You must pay extra attention during the learning phase to absorb things quickly and utilize them well. So, keeping a cool head and a relaxed mind will help you understand the various features of this software. The software has many features that can yield excellent results if appropriately utilised at the right time and place. So, if you follow the tips in this tutorial, you will have no problem using the software to your benefit; you simply need some patience. If you are using this software for the first time, you will face failure the first couple of times, but that is no reason why you should feel discouraged.

You may also look at other tutorials to learn more about this beautiful software. The best way to know anything about this software is to consult a tutorial such as this.

Create Custom Error Pages in cPanel


How To Create Custom Error Pages in cPanel

Well, if you are looking for a way to learn to create custom error pages in cPanel, you have definitely found the right article. This article is not just an ordinary article but a tutorial that will explain how to create custom error pages in cPanel in some straightforward steps without getting too technical at any point in time. cPanel is a handy software that has a wide plethora of features. The tools found in the software facilitate smooth business operations over the Internet. The software’s primary function is to help the users manage the servers very well.

1) You must begin by locating the icon that says Error pages; once you have found it, you must click on it. Now, you should remember that there are many ways to carry out the customization, but in this particular tutorial, we will go with the 404 error page option.

Create Custom Error Pages in cPanel

2) Now, bearing the above point in mind, you will have to click the link that says 404.

custom error pages

3) This is where you can create custom error pages in cPanel. You can use more than one tag to add customization.

4) You can utilize the HTML tags on your page to match the set-up of the error page you created.

custom error pages

5) create custom error pages in cPanel: You are ready to create your very own custom 404 page.

custom error pages

6) create custom error pages in cPanel: When you are done, click save.

custom error pages

Create custom error pages in cPanel: When you have cleared the above steps, your 404 error pages have been created. You can also add your touch of customization. Well, this is where the tutorial ends.

Now, you can return to the cPanel interface and start by reviewing all the available features. Now, since there are so many features, you should take the time to go through them properly.

Now, you must know how to log out from the interface; the good news is that it is not difficult. You simply have to locate the log-out tab and click on it. You may have also realized that the tips mentioned in the article are not challenging to follow. You just need time to go through the details and understand what the software is all about. So, when you are in the learning phase, you should not rush the process as you can get a grip on things a little bit better. So, having a calmer and more relaxed approach to things is better. You may also take a look at some of the other tutorials. A tutorial is an excellent way to learn new software aspects. To get the best out of this software, you should follow the tips given in the tutorial, and soon, you will be able to master the software.

The Index Manager in cPanel


How To Use Index Manager in cPanel

Before you start using the index manager in cPanel, you must read this tutorial that will guide you through the entire process so you can achieve good results effortlessly. Now, if you are a newcomer to this software, you should learn specific facts about this software. The panel is considered to be handy software. This software has some advanced tools that permit you to complete any activity via the Internet very smoothly. This software is also used to manage the servers very well.

Now let us look at the process of how you can use the index manager in cPanel

To start things, locate the index Manager icon and click on them.

After that, you must select a directory you wish to begin with; after that, you must click on Go. At this point, you will see that the manager will permit you to control the directories on your website. The index manager provides very high security that will not display any content.

How to configure the Index manager in cPanel for clients directory There are four methods that you can choose from

1) If you go for the default system, the contents of the.

Index Manager in cPanel

2) The no-indexing system will not display the directory’s contents.

index Manager

3) Standard indexing will prevent the browsers from viewing the contents in the directories that may not contain any image file.

index Manager

4) Fancy indexing is another method that prevents the directory’s contents openly.

a) Since you do not wish the contents of the directories to be displayed openly, you must choose the No indexing option.

index Manager

b) After completing the above option, click the save option.

index Manager

So you have successfully configured the index manager in cPanel; once you have done this, no outsider can view any of the contents within the directory. So you see that there is not much technicality involved here. You can configure the index directory protection for any directory that you want.

Now, you can simply go back to the interface of your cPanel, and you can start using all the features. Before you get too deep into the parts, read this tutorial well and try to understand each toll’s function. cPanel is a beautiful software with fantastic results, provided you know how to use it well.

To exploit the software to the fullest, you have to absorb all of the features, and for that, you have to devote sufficient time to looking over all the parts well. It is not tough to drink the points mentioned in the tutorial. You just need to have a lot of patience and a relaxed approach to things before starting.

Follow the tips mentioned in the article, and you should have no problems using the index manager in cPanel.

Setup Domain redirects in cPanel


How To Setup Domain Redirects in cPanel

While trying to learn something technical, it is always better to take the help of a tutorial that guides you through a process with clear instructions. Now, speaking of tutorials, this article could be a good tutorial that will help you set up domain redirects in cPanel. Before we get into the technicalities of it all, you should know something about cPanel, especially if you are new.

cPanel is a beautiful software with automated tools that allow the smooth execution of business activities. The devices respond rapidly to any command. People use the various features of the cPanel to manage their servers.

Now, here are the easy steps on how you can set up domain redirects in cPanel.

The tutorial assumes that you already know how to log in to cPanel.

1) First, you must locate the redirects icon and click on it.

setup domain redirects in cPanel

2) Then, you can state whether you want this redirect option to be permanent or temporary.

Domain redirect

3) After that, you must enter the URL you wish to redirect.

Domain redirect

4) The most crucial part is entering the URL to which you want to be redirected.

Domain redirect

5) Lastly, simply click on Add. So you see, it is pretty simple, provided you have taken care of the above.

Domain redirect

6) Now, you may click on the go back; here, you can view the list of the domains; you can manage them or even delete some of them from the list.

Domain redirect
Domain redirect

This is where the tutorial ends, and you already know how to set up domain redirects in cPanel.

So now you can return to the user-friendly interface of cPanel and start by looking at some of the features such as the shopping carts, multiple domains, and the various email settings and going over the databases. However, when going through such features, you must take the time to absorb every part of the software. By now, it may have dawned upon you that understanding the points mentioned in the article is not challenging. So, when learning about the various features, you must not rush the process as some may be technical; try to pay close attention. You should know at your own pace; a relaxed approach is the best way to do such things. This will help you in all forms.

Now, if you are a newcomer to cPanel, then you should know that there are certain things that you should know that initially, things are not going to go your way, but that is not a sign for you to get agitated or feel like giving up; just have some patience and things will work out fine. Follow the tips in the tutorial very closely to get the whole process right without facing any problems.

MySQL database in cPanel


How To Create a MYSQL Database in cPanel

If you want to create a MYSQL database in cPanel, follow the tips mentioned in this tutorial, as they will immensely help you in the long run. Many of you may be new to cPanel, so it is better to be acquainted with the software before getting into the technical aspects. cPanel is a handy software that has very sophisticated tools. These tools allow the users to complete any business activity smoothly without any hitch. With these tools, you can manage your servers without facing any problems.

When reading this tutorial, it can be safely assumed that you already know how to log in to the cPanel. Let us now look at the steps that will help you create a MySQL database in cPanel

1) You must start by locating an icon that says MySQL database wizard. Once you locate this icon, click on it.

mysql in cPanel

2) Then you must enter a specific name for a new database

mysql in cPanel

3) Click on the next step button

mysql in cPanel

4) This step will make you create an ID for a user and fill out a username in this step.

mysql in cPanel

5) You have to press enter, and then you have to type in a password for confirmation.

mysql in cPanel

6) After you have taken care of the above, you must click on the Create User button

mysql in cPanel

7) This step is where you can assign privileges to a user

mysql in cPanel

8) To finish off, you must click on the next step button

mysql in cPanel

Once you have taken care of the above eight steps, you have successfully created a MySQL database in cPanel. So now you can simply go back to your interface, look at the other features, and even configure specific settings. There is a lot on the interface you can use, so take the time to review them.

If you pay close attention, you will see that this tutorial is not challenging to understand. You need to have a decent level of patience to understand what your software is all about. During the learning period, try not to rush things, as you may miss out on some of the most critical aspects of the software. Items will not be accessible initially, but eventually, you will get used to it. So, it is best to have a relaxed approach while learning about this software, as you can learn something effectively. You can consult other tutorials to get a good idea if you want. If you are a new user, you may take some time to get accustomed to things, so do not get worked up or disheartened. Follow the tips in the article very closely, and you shall have no problems creating a MySQL database in cPanel.

Park a domain in cPanel


How To Park a Domain in Cpanel

Learning to park a domain in cPanel is not tricky, provided you have an excellent tutorial to guide you through the process. If you are reading this, you are in luck, as this tutorial will help you understand all the aspects. Before we forge ahead, we should learn a thing or two about cPanel. cPanel is a handy software with some of the best tools to make any business operation a breeze. So, as a user, you will face no problem managing all your servers.

Now let us look at the steps to park a domain in cPanel

1) First, you must locate an icon that says Parked domains and click on it. This option is handy when you have more than one Domain for your website; this will permit people to access your website from any part.

Park Domain
Park Domain

2) After that, you must fill in the domain name you wish to include and finish by clicking Add Domain. However, you must note that you have to configure the new Domain similarly to the mother domain, or you may be unable to redirect. This step will also allow you to see the various parked domains. You also have the option of deleting or managing the parked domains.

Park Domain
Park Domain

With this, we come to the end of this particular tutorial. Now, you can go back to the interface of your cPanel. Here, you can look at the settings of the shopping carts, emails, databases, or even the various domains. To get a grip on things correctly, you must take the time to absorb other items in the panel.

The tips mentioned in the article are not challenging to follow at all. In fact, if you have a little patience, you can understand all the aspects properly. Things may not be accessible initially, but eventually, they will all fall into place. So you see that it is essential that you relax to understand things better. A relaxed approach will indeed have better results in the long run. You are free to consult other tutorials to get a better idea. If you are new to cPanel and its features,

there is no reason you should get worried; you just need to learn things gradually, and slowly, you will get the hang of things. You always have this tutorial to learn to park a domain in cPanel. Now, during the learning phase, it is best to not rush things as you may miss out on many things. To log out of the interface, all you have to do is click the logout option. Follow the guidelines in the articles, and you should have no trouble.

Create an addon domain in cPanel


How To Create an Addona Domain in Cpanel

If you want to create an addon domain in cPanel, follow a series of steps. This article will serve as a tutorial to guide you through the process. Before going ahead, it will be better to have a little introduction to this beautiful and helpful software. cPanel is a prevalent software with a user-friendly interface loaded with advanced tools that facilitate smooth business functions. The primary process of this software is to help you manage your servers.

Now, let us look at the steps that will allow you to create an addon domain in cPanel without facing any difficulties.

1) You have to begin by selecting an Addon domain icon and simply click on it. You will then be taken to a page where you can configure multiple domains for your account.

addon-00

2) The third step will require you to type in a new domain name

addon-02

3) After that, you will have to enter a username for your Domain

addon-03

4) Press enter and the Domain will have to confirm your password by retyping it

addon-04

5) You can finish off by clicking on Add Domain

addon-06

After the fifth step, Domainan, be assured that the addon domain has been created; now, you can see a list of all the parts. With this, you have reached the end of the tutorial.

So now you can go back to the interface and check out the other settings. You can take the time to go through the tabs on the particular cPanel. Since you already know how to log in, logging out should not be very tough. You must locate the log-out charge at the top of the page. The points in this tutorial are not challenging to follow under any circumstances; you simply have to take the time and follow the tips. During the learning phase, you should not rush into things as you can learn much about the software that will benefit you in the long run. So you should take the time and get to know every aspect of the software. So it is best to remain relaxed and try to get a grip on things, as this will significantly help you.

You may also feel free to consult any other tutorial, but whichever tutorial you follow, you must stick to the advice given in the article. You do not need to get agitated if you are a newcomer while using this software. You may initially find it a little tricky to use, but eventually, you will get used to the whole thing quickly. Start using cPanel today without hesitation, but before you do, follow the tips in the article very closely to get the best results quickly.

Creating a Subdomain in Cpanel


How To Create a Subdomain in Cpanel

If you have had no success locating a tutorial that will help you create a subdomain in cPanel, you are indeed lucky now. This article will be a tutorial to teach how to create a subdomain in cPanel. Well, for those of you who may not be very familiar with cPanel, this is a handy software with automated tools that facilitate smooth business operations via the internet. The primary function of cPanel is to help manage the servers.

So, it can be assumed that you already know how to log in to cPanel without difficulty. Okay, let us go over the steps that will teach you to create a subdomain in cPanel.

1) To begin, locate an icon that says Sub Domains. Once you have found this, you have to click on it.

subdomain-00

2) After that, you will be required to enter the prefix of the subdomain that you wish to create

subdomain-01

3) You must select the domain name you wish to associate your subdomain with. After doing this, you will see that a directory name, the same as the subdomain prefix, will appear automatically, but you can change the word if you like.

subdomain-02
subdomain-04

4) After you feel that you are ready, you must press create and create your subdomain.

subdomain-05

Once you have completed the last step, it means that you have reached the end of the tutorial, and you can create a subdomain in cPanel So now you have to simply go to the interface of the cPanel, and you can begin work with the various features of the cPanel. You can start working with the emails and multiple domains and configure your emails.

Logging out from the cPanel is not so tough after all; you simply have to locate the logout button on the top end of the page. The tips mentioned in the article should not be very tough to follow. In fact, if you take the time and follow the directions, you will not have any problems. You simply have to have a little patience to understand the software. You should not rush the learning process as you can learn tons during this phase. So take your time and review things until you feel you have absorbed every aspect of the software properly. So try not to get worked up; try relaxing instead, and the results will be great. Now, you can also consult other tutorials. However, if you are a newbie to this, you should really take the time to understand the software’s various features. This tutorial is just perfect if you want to learn to create a subdomain in cPanel. To get the best results, follow the tips in the article very closely, and you should have no problems.

Hotlink protection in Cpanel


How To Use Hotlink Protection in Cpanel

This article will be a tutorial to help you understand how to use Hotlink protection in cPanel. The tutorial will give you a series of easy steps to follow. Now, before we proceed, it would be better to have a bit of an introduction to cPanel. cPanel is a beautiful software loaded with sophisticated tools that make some of the most complicated operations seem like a walk in the park. This software is basically used to manage the servers properly.

So, it can be assumed that you are already logged into the cPanel interface; so now, let us look at the steps to use Hotlink protection in cPanel.

1) To start, locate the Hotlink protection icon and click on it. This will stop any other website from linking specific files, mainly image files, to your website. This feature would be good for you if you have images under copyright or want to save a little bit of bandwidth. This helps you hotlink all the photos.

hotlink-00

2) The second step will be when you will have to enter all the files that you are looking to protect.

hotlink-03

3) This option is also significant if you want to permit people to type in the URL of a file that is under protection; then you will need to enable this.

hotlink-04

4) You then have to type out a URL to which you want people to redirect if someone wants to hotlink to the images.

hotlink-06
hotlink-07

5) After you have taken care of the above, you must click on Submit, and with this, you have successfully enabled hotlink protection.

hotlink-09

6) If you want to disable the hotlink protection, simply click on the disable protection.

hotlink-11

So this is the end of the tutorial, and now you can use hotlink protection in cPanel without any difficulties.

The next most important thing you should know is how to log out from the interface, which is not challenging. All you have to do is locate a log-out button at the top of the page and click on it. The tips mentioned in this tutorial are not challenging; you must pay close attention to them to get the best results possible. You have to be patient with things as this will give you some time to understand the software and its features well. So, do not rush the process when you are learning the software. In fact, you should try to keep calm and go over the various features repeatedly to get a grasp of things.

You may also feel free to look into other tutorials as well. If you are using cPanel for the first time, you may take a little time to get familiar with things. It would be wise to consult the tips mentioned in the article to get the best results.