Templates Express


How to Install Templates express

Now, you may have looked all over the internet for a tutorial on installing Templates Express, but most of the time, you will come across tutorials that will not teach you the correct procedure. However, this tutorial is designed to guide you through systematic steps through the installation period.

Templates Express is a beautiful application from Fantastico. This application has a straightforward interface and can be handled by almost anyone. You can incorporate handy templates for your website depending on its usage. Fantastico is a company that has been operating for years, providing users with reliable services. All the applications provided by Fantastico are very compatible with cPanel. Fantastico has a vast stock of scripts that enable you to install the application quickly.

Let us go over the steps you need to follow if you want to install Templates Express.

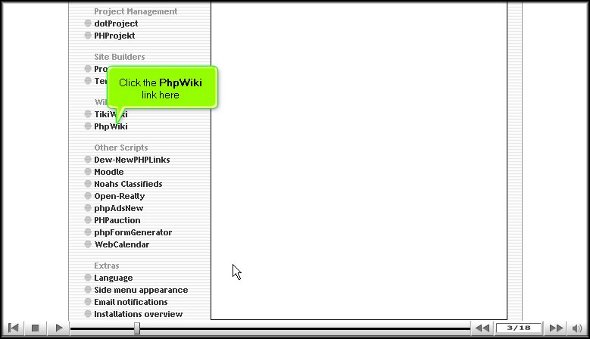
1. You must locate a Templates tabExpress on the Fantastico interface. Once you have found this tab, click on it immediately.

Templates Express

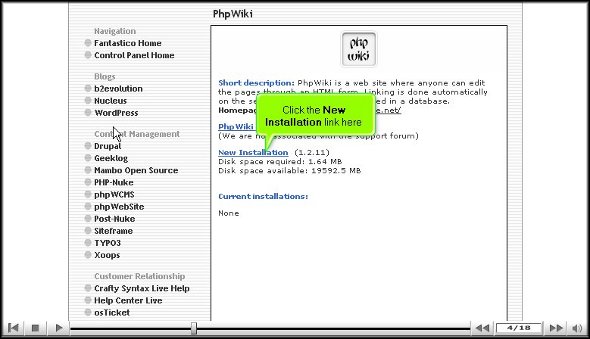
2. After you have clicked on Templates Express, you will be taken to an installation screen where you have to click on a link that says “New installation”.

Templates Express

3. After performing the above action, you will be directed to another screen to select a category depending on your website type. After selecting the particular category, you must choose the type of template you are looking for.

Templates Express
Templates Express

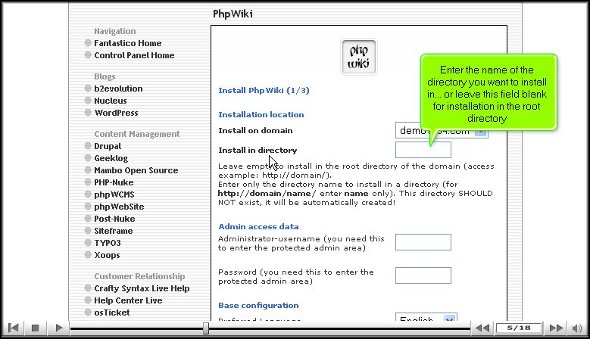
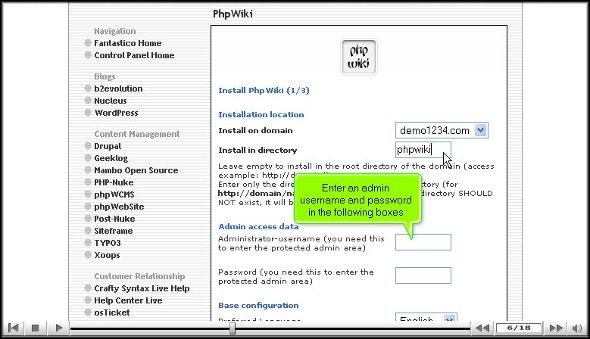
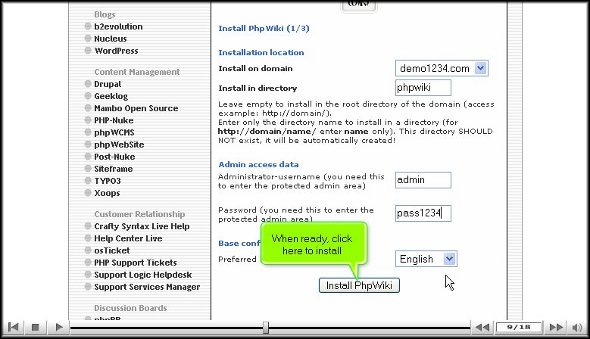
4. After that, you must type in the name of a directory in which you wish to install Templates Express. On the same page, you must type in your name, organisation address, telephone number, email id, and copyright.

Templates Express
Templates Express

5. To start the installation program, you have to click on Install Templates express

Templates express

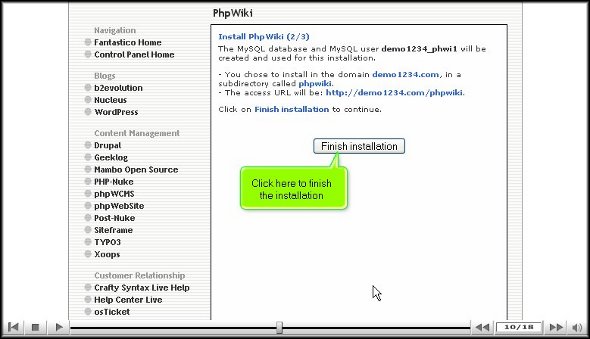
6. To confirm that the installation process for Templates Express has ended, you will have to click on finish.

Templates Express

If you have followed the steps mentioned above in the correct order, you successfully installed Templates Express the right way. After you finish the installation process, you can start by going through the various tools available in the application. It would be best if you took your time to go through each feature. Do not rush the learning process; you may miss some essential application parts. You may consult some other tutorials to learn this particular application’s features. As a first-time user, you may have a lot of trouble understanding how to use specific elements in the application, but the trick is to keep calm and get through the learning process. After you have spent quite a bit of time with the application, you should start configuring the settings of the tools as per your requirements. This application also facilitates e-commerce. As a user, you will notice a significant improvement in your operations once you have used Templates Express for a substantial period. So, to get the very best out of the application, you should follow the tips in the article and download the application correctly.

Go to the top of the page. Back to the tutorial

TikiWiki


How To Install TikiWiki without facing any problems

Now, TikiWiki is not a very difficult application to install on the computer. All you have to do is follow the steps mentioned in the tutorial, and you will face no problem. TikiWiki is a beautiful application by Fantastico, a reliable web hosting service provider.

All the applications provided by Fantastic are straightforward to use and handle. These applications are pretty compatible with cPanel. Fantastico provides handy scripts that make the application process easy and less time-consuming.

Let us look at the steps you must follow while installing TikiWiki on your computer. Since you are going through this tutorial, you already know how to use Fantastico’s interface.

1. To start the process, you will have to click on TikiWiki

tikiwiki

2. Once you have clicked on this tab, you will be taken to an installation screen and have to click “new installation.”

tikiwiki

3. After that, you will be taken to another screen where you must type in the name of the directory where you wish to install TikiWiki.

tikiwiki

4. After completing the above, you can click install TikiWiki.

tikiwiki

5. To complete the installation process, you must click on finish.

tikiwiki

With this, we have reached the end of the tutorial. Now, you can use the admin name and password to log into your account. This application has many features and tools that can let you perform various activities. It would be best to go through the application interface to learn how to use it well. It would be wise not to rush through the installation process as you will miss out on the essential aspects of the application. You may consult some other tutorials to learn about the various tools and their usage,

If you happen to be a new user, you may find it a little tricky to go about the interface, but once you spend a little time, things will work out just fine. Together, you will need to have a lot of patience and stay calm. The best part about this application is that you can tweak certain features as per your requirements, so once you are confident about it, you can start configuring the settings. Once you start using this application, you will notice a drastic change in the performance of your website within a short period.

So you understand that TikiWiki is a handy application provided by Fantastico, so to bring out the best from the application, it has to be installed correctly. So, ensure you do exactly as mentioned in the tutorial to complete the process correctly.

Go to the top of the page. Back to the tutorial

AZ Law Could Outlaw Parodies


Cyber bullying is a big problem. It’s a problem that we’ve addressed on this site. We’ve also talked a lot about cyber squatting via cheap hosting sites. In a sort of mix of both forms of cyber crime, the state of Arizona has made an interesting move.


AZ bullying laws

http://www.ananova.com/az-law-could-outlaw-parodies/

More Torrent Sites Blocked in UK


http://www.ananova.com/more-torrent-sites-blocked-in-uk/

uk flag

Yesterday, we announced that all adult content would be blocked for UK residents. We also reported that publishers are urging companies like Google to remove pirated websites from the Internet. Today, we report that a ton of UK torrent (and other) websites have been blocked from view.

How to Build Your Brand


Snagged a great cheap hosting deal? Set up a site? Got tons of readers? Now what? You have to keep pushing the envelope in order to keep that momentum going. How? It’s not as tough as it seems.
Read more at:

http://www.ananova.com/how-to-build-your-brand/

branding

ZenCart


How To Install ZenCart

ZenCart is a shining star in the world of e-commerce. It is an open-source application written in PHP. It helps you to customize an online store very quickly. This shopping cart system lets you explore the endless possibilities of e-commerce without any hazards.

ZenCart uses a MySQL database and HTML components. It has a built-in system that can calculate discount rates, help set taxes, receive online payments, and numerous other features. It is available under the General Public License (GPL), so you do not have to spend any money to download it.

Before you install and start using ZenCart, you may become curious about its advantages so that you can choose wisely; here are some benefits of ZenCart that are given below:

It is straightforward to install. You can navigate around it very quickly. You can customize it to your liking. It has automated tasks. Proper support is provided for numerous languages and currencies. It is free of cost.

Now, to install ZenCart, you must read all the information correctly. It will be installed from Fantastico, a reliable web hosting service provider. To successfully install ZenCart, you must ensure that the Fantastico application is already downloaded, and you have to launch it.

After that, follow these quick steps:

1. Click the ZenCart link on the left of the Fantastico screen.

Zencart

2. The ZenCart application screen will appear then.

Zencart

3. To install ZenCart in a directory, enter a directory name in the appropriate field. If you install it in the root directory, leave this field blank: example- store.

Zencart

4. In the next step, enter the administrator’s name and user password in the respective fields on the same page.

Zencart

5. On the next page, scroll down, and you will see a field where you must enter an administrator’s email address.

Zencart

6. After entering the email address, you will see a tab below called ‘Install ZenCart’; click on it to Install ZenCart.

Zencart

7. On the next page, you will see a tab called ‘finish installation’. To finish the installation process, you have to click on it.

Zencart
In this way, ZenCart is correctly installed on your account. If you do not face any difficulty in this process, you can be sure it has been installed on your account.

8. When you further access it, type the admin name and password you have given before.

9. Your new installation will be listed on the script’s homepage.

After installation, you may start exploring all its facilities and features. It is very user-friendly, so you will not have trouble customizing and navigating around it. But do not make haste in learning all the features at once. You should be very patient and go slow on learning it. You may find it challenging to use some aspects of the application initially, but as you spend more and more time with the application, you will gradually get used to it.

Good luck using ZenCart!

Go to the top of the page. Back to the tutorial

Support Service Manager


How to install Support Service Manager

If you are having difficulty installing Support Service Manager, that is only because you may not have followed a proper procedure. Well, this tutorial will help by guiding you through the entire process. Support Service Manager is a helpful application by Fantastico, a reliable web hosting service provider. The company has been around for many years, providing users with valuable applications. The applications provided by Fantastico are straightforward to handle and equally easy to install on the computer. All the applications can be used with cPanel.

Fantastico has a beautiful stock of scripts that will let you install the applications easily on your computer. These scripts also help you to save a lot of time. This tutorial has been broken down into easy-to-follow steps to make things easier.
The steps to install Support Service Manager on your computer can be listed below.

1. To start the installation process, locate a tab that says Support Service Manager.

Support Service Manager

2. Once you locate this tab, you must click on it; you will be taken to an installation screen where you will have to click on a link that says new installation.

support service manager

3. After you have clicked on the new installation, you will again be taken to another screen where you will have to mention the directory where you want the building to take place. You also have the option of installing the application in the root directory.

Support service manager

4. On this same page, you must assign a name to the admin and provide a strong password.

support Service manager

5. To begin the installation, you will have to click on Install Support Service Manager.

Support Service Manager

6. To complete the installation process, you must click on finish.

Support Service Manager

This is the end of the tutorial, and if you have followed the steps mentioned above in the proper order, you have successfully installed the application properly. To learn how to use the software properly, you should start exploring the tools and features that come with this application. Now, you can know how to do many things if you spend time with the application. However, you must not rush through the learning process, as you may miss out on some crucial aspects of the application.

As a new user, you may face application problems, but the best way to overcome such difficulties is to keep a cool head and relax. You can consult other tutorials to understand how to use the tools in this application. Once you feel confident about the application, you can start configuring the settings of the application to suit your purpose. You must install this application immediately without hesitation to get the best out of this application. This application is handy; as a user, you will experience tremendous improvement in your operations.

As the world becomes a global village, international trade becomes more popular and competitive. Multinational companies are growing fast, leading to the development of society as a whole. Maintaining good interaction between all branches becomes more vital as these companies grow and expand. Our computer systems, internet, and allied services like voice conferencing and video conferencing make this possible. While using these features, you will often encounter software glitches and hardware faults that a technical expert can solve. The more we depend on these technical features, the more the need for technical support increases. The support service manager helps you accomplish these tasks.

Support Service Manager is an application script proven to be a master solution to all your technical problems. Often, multinational companies outsource their technical support to a third-party vendor. These third-party vendors may be located in any part of the world. When an employee or user, as referred to in general terms, faces a software glitch or a hardware issue, they raise tickets via the Support Service Manager, and the technical experts get the same through emails. The Support Service Manager is often synchronized with the knowledge base, providing users online support. They can refer to this knowledge base and solve their issues instantly. It is a beautiful support application for translating ticketing matters and sending administrative support.

Go to the top of the page. Back to the tutorial.

Support Logic Helpdesk


The process of installing the Support Logic Helpdesk

Support Logic Helpdesk is an application that Fantastico provides. This application has many useful features and easy-to-use tools that permit you to do many activities. Fantastico is a company that has been providing very reliable services in the field of web hosting for many years now. The applications provided by Fantastico are straightforward to use as they have very user-friendly interfaces. These applications are also specific to install. The good news is that all the applications are compatible with cPanel.

Now, Fantastico gives its users specific scripts that allow them to install the applications quickly. Now, if you are looking for a tutorial on installing the Support Logic Helpdesk on your computer, you are looking in the right place. This tutorial will teach you how to install this fantastic application through easy-to-follow steps.

Let us now look at the steps to install the Support Logic Helpdesk.

1. First, you must look for a tab that says Support Logic Helpdesk and then click on it.

support logic helpdesk

2. Once you click on the above link, you will be directed to an installation screen; now, you will notice a connection there that says new installation, and you have to click on it.

Support logic helpdesk

3. The next screen will require you to submit more details, such as a directory name in which you want to install the application.

Support Logic Helpdesk

4. On the same screen, you must assign a name for the admin and submit a password.

Support logic helpdesk

5. Once you have submitted all the details, click Install Support Logic Helpdesk.

support logic helpdesk

6. To complete the installation process, click on finish.

Support Logic Helpdesk

With that, we have come to the very end of the tutorial on how you may install the Support Logic Helpdesk on your computer. After completing the installation, you can look around and explore the application. This application has sophisticated tools that will let you perform various activities quickly. There are a ton of things that you can learn. It is best when you do not rush the learning process. You can consult other tutorials on how to use the various tools in the application.

Initially, you may feel that the application is challenging, but if you take a little time and go through the interface, you will get used to it quickly. The best part about this application is that it has certain features that can be configured per the client’s client’s requirements. You can consult several tutorials on configuring these applications, too. Just try to be patient, and you can use this application quickly. As a user, you will soon understand that you have benefited from this application for some time. So start using the Support Logic Helpdesk today without any hesitation at all.

Go to the top of the page. Back to the tutorial

phpWebSite


Tutorial on installing phpWebSite on your computer

PHP website is yet another practical application that is provided by Fantastico. This application has a wide range of features and sophisticated tools. This application is straightforward to use as it has a user-friendly interface. Now, fantastico is a very reliable web hosting service provider. This company has been operating for several years and has become very popular. All the applications provided by Fantastico are very compatible with cPanel.

Fantastico also gives you access to many other scripts to help you install the applications without problems. These scripts allow you to save time without any doubt. This tutorial will teach you how to install PHPWebSite on your computer without issues.

So, let us go into the tutorial on installing an excellent application like phpWebSite. The tutorial is broken down into steps that should be followed systematically to get the process right.

1. To start the installation process, you must locate a tab called phpWebSite on the left-hand side of the screen; once you do, you have to click on the account.

phpwebsite

2. After that, you will be instantly taken to an installation screen, where you must click on the new installation.

phpwebsite

3. After that, you will be taken to yet another screen where you must type in a directory name where you wish to install phpWebSite.

phpwebsite

4. On the same screen, you must type in an administrator name and a password.

phpwebsite

5. Once you have completed the above, you have to click on install phpWebSite

phpwebsite

6. To confirm that the installation has finished, click on finish.

phpwebsite

This is the end of the tutorial. If you have followed the abovementioned steps correctly, the application has been installed successfully. Now, you can look around and review the different features and tools. This application has many features that will let you achieve quite a bit. The best way to explore this application is to relax and review the prelaxidually until you understand each detail. Do not understand the learning process, you might miss out on some of the application’s most essential elements. There are separate tutorials that teach you about the application’s various features; you can also consult them.

Initially, you may find phpWebSite a little tricky, but once you spend a little time with the application, you will get accustomed to it, and things will work out fine.

Once you feel confident about using the application, you can start configuring it per your requirements. Certain features of this application can be tweaked as per the user’s choice, which is a huge benefit. This application also has certain features that facilitate eCommerce. So, to install this application, you must pay close attention to the tips.

Go to the top of the page. Back to the tutorial

Phpwiki


The correct way to install PhpWiki

In the past, people have complained, saying that PhpWiki is an application that is very difficult to install on the computer; well, that is because they do not follow the proper steps to install this application. Now, PhpWiki happens to be a fantastic application that people use often. This application has many sophisticated tools and advanced features that let you perform various activities. This application is provided by Fantastico, a reliable web hosting company. The company has been around for many years and has become very popular.

The applications provided by the company are very user-friendly and compatible with cPanel. Fantastico has a good stock of scripts that you can use to install the application quickly. If you have been looking for a tutorial on installing PhpWiki, you are reading the proper tutorial. This tutorial will guide you through a series of steps to teach you how to go about the installation period.

The steps to install PhpWiki are listed below.

1. when going through the Fantasticoace of Fan, you first locate a tab that says PhpWiki.

phpwiki

2. Once you locate this tab, you must click on it instantly; then, you will be directed to the installation period, and on that page, you will have to click on a tab that says new installation.

phpwiki

3. On the next page, you must provide the directory name for installing the application.

phpwiki

4. It is compulsory that you assign a name to the admin and also provide a password.

phpwiki

5. After providing all the details mentioned above, click on Install PhpWiki.

phpwiki

6. To complete the installation process, click on finish.

phpwiki

This brings us to the end of the tutorial on installing PhpWiki on your computer. So, you must follow the steps mentioned in the tutorial to install the application properly. This tutorial will significantly help if you install an application like PhpWiki for the first time.

After installing the application on your computer, you can look around and go through the various features and tools that the application has. You may consult other tutorials for this, but you can learn better if you explore the application yourself. However, you must remember that you should not rush the learning process, as you will miss out on some of the best aspects of the application,

Initially, you will take some time to get used to the application, but once you start spending some time with it, things will be fine. You simply have to maintain a certain amount of patience.

So, just stick to the tips mentioned in the tutorial, and you can install the application on your computer without fail.

Select Best Web Hosting Provider