Mx Entry in cPanel


How To Add Mx Entry in cPanel

Now, to learn how to add an Mx entry in cPanel, you must go through this tutorial. Before we get into all of this, you must know what a cPanel is in the first place. Well, the good news is that it is not complicated at all. In fact, it is a software that is very easy to use. In fact, this software comes with specific automated tools that help users carry out their business operations quickly and without facing any technical problems. You may have understood that a cPanel is essential and helps manage servers easily.

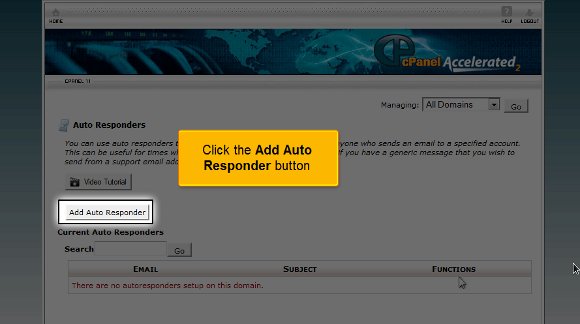
Now, let us look at the steps that will help you to add an Mx entry in cPanel.

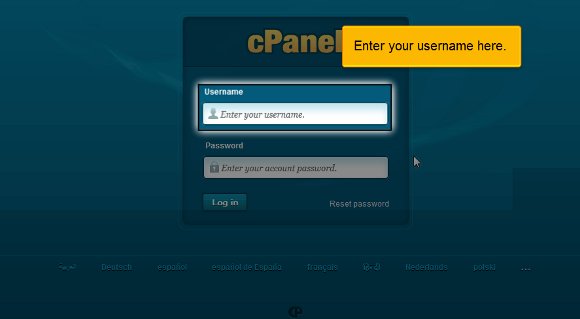
Now, it can be assumed that you know how to log into cPanel.

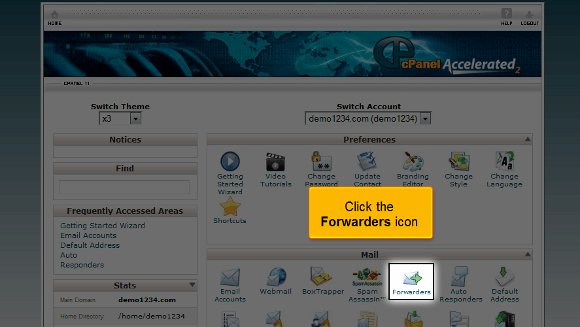
1) Firstly, you will have to locate an MX entry icon. Once you have found this icon, you have to click on it. After that, it is best to set the settings to custom, as this will also make it compatible with other servers.

00-Mx-Entry

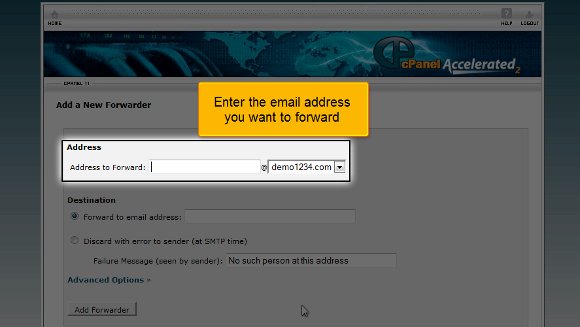
2) After the above, you must fill in a priority number to create a fresh MX record. The most minor priority numbers will be put in first, and the highest numbers will be entered.

01-MX-priority

3) After that, you may enter the fresh MX entry

02-New-MX-entry

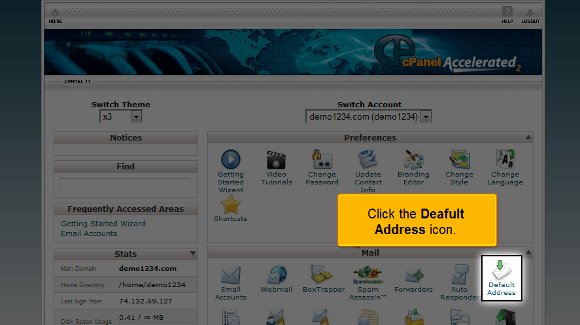
4) After you have completed the above steps, you will need to click on a button called Add new record.

03-add-new

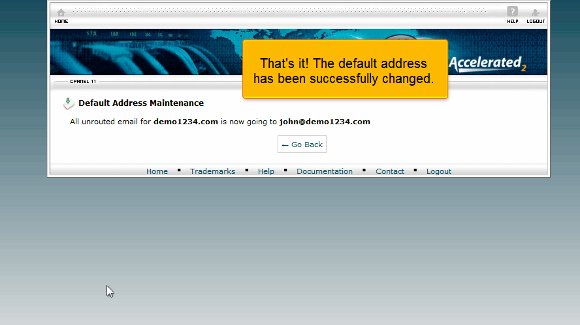
So that is about all; at this point, your new MX record is added. This is where the tutorial ends.

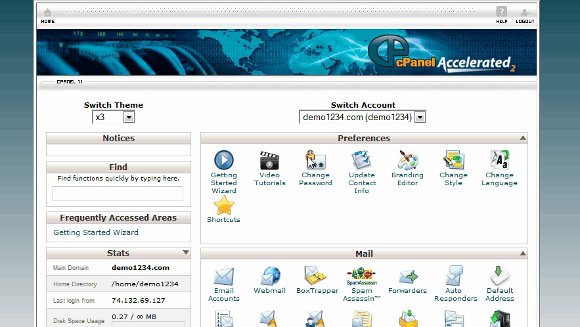
Now, you have to go back to the cPanel interface and look at the settings correctly. You must take your own time in going through the other tabs that are present in the cPanel.

Now, you must know how to log out; that should not be so tough, as you must locate a logout button at the top of the page. By now, you may feel that this tutorial is not complicated to understand. All you need is a good amount of patience so that you can put in some effort to try and understand the

various aspects of the cPanel. You do not have to rush the learning process, as there are things that you need to absorb well. It is always advisable to have a relaxed approach to things as this will benefit you in the long run.

You may also feel free to look at other tutorials on adding an Mx entry in cPanel. If you are new to all of this, you will face failure the first couple of times, but things will work out just fine. So keep your cool and follow the tips in the tutorial, and you should face no problems using the cPanel to the fullest.

Email forwarding in cPanel


How To Do Email Forwarding in cPanel

You will find this tutorial very helpful in learning the methods used to set up email forwarding in cPanel. Before we do that, you should know a little about cPanel and what it does. Well, a cPanel is really simple; it is fantastic software with a user-friendly interface that permits users to utilize automated tools to complete their business activities smoothly. So, by now, you have understood that a cThe panel is crucial when managing servers and the various factors relating to website ownership.

This tutorial assumes that you already know how to log on to cPanel well.

Now, we will learn the various methods used during email forwarding setup in cPanel in easy steps.

1) First, you must locate the Forwarder’s symbol or icon.

00-email-forwarder

2) This function will allow you to send a specific email from one address to another. This comes in handy if you have more than one email address.

3) After this, you will need to perform an action called Add Forwarder

01-add-forwarder

4) It is here that you have to type in the email address that you want to send the message to.

02-forwarder-email
03-email-forward

5) you must click the Add Forwarder tab at the end.

04-click-add
05-successfully-add

So you see that the steps are straightforward to understand, and almost anyone can do it; you do not need technical knowledge. The email forwarder has now been configured and can be used immediately. You can always return to this page to create more forwarders or remove certain existing ones. With this, you can also make specific domain email forwarders. This is where the tutorial ends; you are now equipped with all the knowledge on the various methods used during the setup of email forwarding in cPanel. Now, you can access your email from the interface and check your settings. You start off by parking multiple domains and setting up your emails. To better understand things, you should take a lot of time going through the various settings on your mail.

Okay, now you should also learn how to log out of the email; that should not be so tough. You simply have to locate the logout tab at the top of the page, click on it, and log out. By now, you may have understood that this tutorial is not too tricky to know if you pay attention to the tips. You just have to have a certain amount of patience to try and understand what cPanel is. You can take your time, and you do not have to rush the process. It is best to slow down things while you are learning. It will help you get a better grip on things. You are also free to consult other tutorials that will teach you the various methods used during email forwarding setup in cPanel. If things do not go smoothly for the first couple of times, do not get worried. Simply follow the tips in the tutorial.

Set Your Default Address in cPanel


How TO Set Your Default Address in cPanel

If you are looking for tips to follow while setting your default address in cPanel, you are certainly in the right place. Before we get into information to help you develop your default address in cPanel, let us learn what a cPanel is. This interface facilitates automated tools that allow a user, reseller, or administrator to carry out their business operations smoothly. So, you see that a C panel’s primary function is to help manage the servers and oversee the other aspects of the website.

Here are the tips that you can follow the information that will help you set your default address in cPanel

1) To begin with, you can log in and need to click on the icon that says Default Address. This is the place where you have to configure a default address. So all those un-routed emails and the emails you send will be stored here. For example,, if you want your emails to go to an account you will be using, simply set that account as your default.

cpanel Default Address in cPanel
00-deafult-Address

2) After you have selected the default address, you must click on the option Forward to email address

02-Forward-Email

3) After that, you must type in the email address that you want as your default address.

03-Enter-Address

4) After typing in the email address, you can click on change and set your default address. This is when you will see that the default address has been placed. The new default address can be seen on the interface.

04-Change
05-successfully-change

So, this is the end of the list of tips you need to follow on setting your default address in cPanel.

Well, you see that there is nothing to it; you can access the default address and start work immediately. You can go through the various settings on your emails and even send a test email to check the settings. You should review all the multiple features in your cPanel regarding the email setup.

Now, you must know how to log out from the cPanel email; the log-out tab is usually at the top of the page. So you see that in most cases, it is not too difficult to understand the tips that will help you set your default address in cPanel. You just need a certain level of patience to simply understand the software and its functions. You do not need to rush the process since you may not get accustomed to it quickly. You can take things at your own pace. This way, you will learn about tips that will help you set your default address in cPanel without facing much trouble. You can also take the time to look around at various other tutorials that teach you tips that will help you set your default address in cPanel. Follow the directions carefully; you will not have trouble setting up your default address.

cPanel Auto Responder


How To Use cPanel Auto Responder

So, if you are looking for a tutorial on how to set up cPanel Auto Responder, you have stumbled upon the right article. Before moving into the technicalities, let us learn about the cPanel. cPanel is a handy software that allows users to utilize automated tools to run business operations smoothly. So you see that a cPanel plays an essential part in managing servers and even looking after certain factors relating to the website.

cPanel Auto Responder: It is assumed that you already know how to log in to the cPanel.

1) Start by clicking on the icon that says cPanel Auto Responder. Using this option, you can create autoresponders that can be used; these can send emails on your behalf to those who send you mail. This particular function is really great.

cPanel Auto Responder

2) After clicking the cPanel Auto Responder icon, click the Add Auto Responder button. In most cases, you will have to set the character to utf-8.

01-add-responder

3) After that, you must enter an email address to set an autoresponder.

02-Chr-set
03-responder-email

4) You will then be required to fill in the entries for the subject and From fields in your email.

04-from-sub-field

5) You will then have to type in your message in this option

05-Message-box

6) After entering your message, you have to click on the option that says Create/ Modify.

06-res-create

Follow the tips, and that is it. Your cPanel Auto Responder will be created within a very short time.

So let us say that if someone sends you an email to your email address, the email saying out of office will automatically be sent to their email address.

So now we have come to the end of the tutorial, and you know how to set up cPanel Auto Responder.

Now, you can return to your cPanel’s interface and check out your email’s various features. In fact, it will be better if you take some time to review some of the other tabs in your cPanel.

Now, you must also know how to log out of your email; you will see a tab at the top of the page called log out. Well, you can be assured that there is a tutorial on How to set up cPanel Auto Responder. You just need a little patience to try and understand the various aspects of the software. You do not need to rush the process, as you may not grasp all of it the first time. In fact, you can feel free to take a sufficient amount of time to learn how to set up an auto-responder in cPanel. You may feel free to look at some of the other tutorials that teach you how to set up an auto-responder in cPanel.

Follow the guidelines in the article, and you shall have no trouble using this feature in the cPanel.

01-add-responder

The best ways to Create a POP Email Account in cPanel


How To Create POP email account in cPanel

Finding a way to create a POP email account in cPanel may not be easy for a novice. However, getting going with your POP email account is not difficult. Some may want to know what it is before they even start operating it. Of course, this may look difficult to beginners, but this tutorial will make it a cakewalk for you in no time. Read on to learn more about the POP email account in your cPanel.

A POP or Post Office Protocol is an application which is a layer of Internet standard protocol. This is mainly used to retrieve emails from remote servers in general. Again, the Internet Message Access Protocol or IMAP and POP are the most popular ways of retrieving emails. This is why most of the webmail service providers also make use of either of these applications.

Here are the steps to follow when you try to create a POP email account in cPanel:

1) First, you must log into your cPanel account.

cpanel POP Email Account

2) Then click on the icon that reads “Email account.”

cPanel Email account

3) Clicking on this icon will take you to another page that asks for your email registration. This usually reads as only “Email”; enter any name to set your email ID.

Cpanel New Email

4) Below this, you can see a box advising you to enter a password. Make sure that the password is of more than five letters. Ideally speaking, you should choose an alphanumeric password.

5) The following box will prompt you to type in your password again for a match.

Cpanel confirm Password

6) Also, you can check your password’s good by clicking on the “Password Generator” button if your interface has one.

Cpanel Password ganerator

7) Right down under this box, you may see what is known as the “Quota” box, which is used to put a limit on your email account. If you have a number on your mind, feel free to express it!

Cpanel Mailbox Quota

8) Finally, click on the “Create Account” tab, as this will immediately create your much-desired POPmail account.

cPanel Create Account
cPanel Email Created

9) After this, you can scroll down only to see that you can change your password, quota, delete, or make any necessary changes to your email and administer them simultaneously without much of a problem.

cPanel Change Email & Quota

Hence, it must be mentioned that creating a Pop email account in cPanel is undoubtedly not that difficult, but the problem lies with one’s expertise. Once you know it, there is no need to worry as you will get used to it soon. In fact, the tutorial mentioned above will give you the confidence to log into your Popmail account without much difficulty. So what are you waiting for? Go ahead and try it right away!

cPanel Login


How To Use cPanel Login

Most hosting companies provide an interface to allow end users to manage allocated resources. cPanel is one such Control Panel.

With cPanel, users can access control panel functions without worrying about anything else. cPanel is a fully automated graphics tool offered to users to help manage all resources offered. cPanel is for server administrators, hosting resellers, and end users.

GUI (Graphical User Interface) is one part of cPanel that provides users with extreme ease of use. Here’s how to access cPanel functions:

1) cPanel Login: A cPanel URL is usually emailed to you after signing up with a web hosting company. To use this URL, open the email and click on the URL (this could be a company’s domain name or IP address ending with either 2083 or 2087). The best way to access a control panel is to simply add a /cpanel to the end of your domain name. This will work once domain name servers are propagated.

2) cPanel Login: Press enter and wait for the browser to load the page.

3) cPanel Login: Now, a page asks you to log in with your user name. Very carefully put your user name into the space provided.

username cPanel Login

4) cPanel Login: Right under this, you will see a small box asking you to enter your password. Typed characters won’t be displayed due to security reasons.

password

5) cPanel Login: Scroll down to the trim tab that allows you to log into your cPanel account.

login-now

Viola! Now, you can see your cPanel interface. Now, you can immediately start accessing databases, setting up email addresses, managing shopping carts, and much more! Take your time to go through the numerous tables that are part of your cPanel. This will help you familiarize yourself with cPanel and all of its offerings. That’s it!

cpanel-view
logout

So, how do you log out of the cPanel interface? Simply click the logout button (usually at the top of the page). As you can see, cPanel is easy to use and figure out, and you’ll get the hang of it in no time! Let us know if you have any questions!

cPanel Support


cPanel Support
cPanel Support

This includes all the latest cPanel Support tutorials for users to get acquainted with cPanel, so we have added how to troubleshoot part in it. Users may comment, and our cPanel support engineers will answer them.

  • Login to cPanel
  • Creating a POP mail account in cPanel
  • Creating a default email address in cPanel
  • Creating an autoresponder in cPanel
  • Forwarding email in cPanel
  • MX Entry In Cpanel
  • Spam Protection With Boxtrapper & SpamAssassin
  • Managing WebMail in cPanel
  • Changing your account password in cPanel
  • Configuring email filters
  • Updating contact info
  • Using cPanel shortcuts
  • Changing your cPanel style
  • Changing your cPanel Language
  • Backing up your site in cPanel
  • Using File Manager in cPanel
  • Using Web Disk
  • Password protecting a directory in cPanel
  • Website stats in cPanel
  • Additional / New FTP accounts in cPanel
  • Providing Hotlink protection in cPanel
  • Creating a subdomain in cPanel
  • Creating an add-on domain (pointer) in cPanel
  • Park a Domain in cPanel
  • MySQL database in cPanel
  • Redirecting a Domain in cPanel
  • Index manager in cPanel
  • Creating custom error pages in cPanel
  • Creating cron jobs
  • Using IP Deny Manager

Best cPanel Supported Hosting

.XXX Domain Names Reduced Drastically During May


XXX shop sign

Two major adult website players have filed a lawsuit against ICM Registry, the site that controls .xxx hosting names. The lawsuit states that the prices for adult web hosting sites are too high, and that these prices need to be lowered in order to create healthy competition.

Details of the .XXX Lawsuit

Typically, an average .xxx site name sells for $100. This is a high price to pay for average website companies. Even though the adult entertainment business is a lucrative one, most online adult companies do not generate revenue right away.

One of the people behind the lawsuit goes by the name of ‘Manwin’ and runs a handful of adult websites. Manwin is asking that the prices be lowered, and claims that these prices are unfair when compared to the rest of the hosting community. Manwin has won this case, and .xxx sites will be cheaper to purchase throughout the month of May.

Lowered Adult Web Hosting Prices In May

Throughout the month of May, .xxx domains will be sold at $7.85. Any companies that lock into this rate during May will be able to maintain the same rate for 10 years. So, if you want to start an adult online entertainment website, now’s your chance to lock in a decent rate.

In addition to requesting lowered .xxx rates, Manwin is also protesting the splatter of advertisements across his sites. Right now, ICM Registry has the right to include any of its chosen advertisements on .xxx sites, but this is going to change in the very near future.

Is $100 Per Domain Too Much?

You might be thinking: “ok, a major adult site can’t afford a $100 domain name? What nonsense!” But, if you think in other terms, you might see how this price is really on the high side. What are those terms? Most adult entertainment companies buy a number of different domains.

The two “major players” that filed this particular lawsuit have more than a handful of domain names between them. Think about $100 X 6 or 7, and you can see why this price is too high. Plus, lowering the price to under $8 will leave room for other people to set up adult domain names. So it all makes sense.

Remember: .xxx domain names are currently selling for under $8 throughout the month of May. If you want to set up an adult site, do it now!

Four Adult Sites And Their Respective Hosting Companies Named In FL Lawsuit


Adult Sites

warning Adult Sites

It’s another revenge porn lawsuit: a Florida woman claims her ex-boyfriend uploaded some pornographic pictures he had taken of her to a variety of different websites / Adult Sites. This woman is outraged and has filed a handful of lawsuits against anyone involved.

You may remember the story we ran about 23 women who filed a class-action lawsuit against those who own Texxxan[dot]com, a website where users upload pornographic pictures of women (typically ex-girlfriends or ex-wives) without their consent, as well as GoDaddy for providing adult hosting services despite knowing full well what Texxxan[dot]com was all about.

Adult Sites: The Lawsuit

Just as with the Texxxan[dot]com lawsuit, it is holding a wide range of parties responsible. But is this going to fly in court? The Florida woman, Holly Jacobs, is suing her ex-boyfriend Ryan Seay, the four websites that posted the pictures, and the shared hosting companies that allowed these sites to post the pictures. But Seay did more than just post pictures!

The lawsuit says that Seay “took appropriated, or otherwise obtained pornographic images” of Jacobs while they were still together. When they broke up, Jacobs says he “began publishing pornographic photographs and video of the plaintiff as well as plaintiff’s name, occupation, details about her schedule, and other personal and private facts about the plaintiff on various websites.”

Adult Sites: Revenge Porn Sites Or Not?

The problem: these sites aren’t exclusively revenge porn sites. Jacobs lists the four sites — anonib[dot]com, pinkmeth[dot]tv, sextingpics[dot]com, and xhamster[dot]com — and labels them revenge porn sites. She says the sites “traffic in pornographic photographs of young women and children as well as private facts and details of the victims.” However, if you view the sites, that isn’t necessarily the case.

Upon visiting XHamster, you see that it isn’t about revenge porn at all, just porn in general. The site states, “we created a perfect platform for users to share their own amateur content and for producers to advertise their professional works.” Pinkmeth[dot]tv is nowhere to be seen, apparently offline, and AnonIB may have pornographic content, but again, it is not revenge porn-specific. Sextingpics, on the other hand, seems to be all about revenge porn.

Adult Sites: What About The Shared Hosting Companies?

Although Jacobs names the companies providing adult hosting services to these four sites, it isn’t likely she’ll claim a victory here. Why? Web hosting companies are granted immunity for the content their customers post for the most part, thanks to Section 230 of the Communications Decency Act.

In fact, the sites themselves may be protected by this very same Section 230. It all depends on their involvement in going through the content users submitted.

According to legal scholar Eric Goldman regarding the GoDaddy revenge porn case, “The legal question isn’t close.” Despite Section 230, a judge opted not to allow GoDaddy to remove its name from the lawsuit. In the judge’s words: “After reading the authorities presented to the court and considering the arguments of counsel, it is my opinion that the Motion to Dismiss should be denied at this time.”

What Jacobs Wants

In her quest to hold all parties accountable for public disclosure of private facts, invasion of privacy, and intentional infliction of emotional distress, she is looking to stop these images from being distributed on the Internet Adult sites, as well as money (surprise, surprise.)

Ultimately, she wants to see these types of sites / Adult sites banned altogether. She has founded a group called End Revenge Porn, working with lobbyists to convince lawmakers to pass a bill to make the act of posting pornographic pictures or videos with personal information attached to any website, including social media sites, a felony.

Most people probably agree that sites like this shouldn’t be allowed. However, do you think that the shared hosting companies should be held accountable for the actions of the site owners? Let us know how you feel!

Cheap Adult Hosting: What You Can Learn From Perfect 10 v. Google


You may remember years ago when the adult hosting site for ‘Perfect 10 Magazine’  sued Google, Amazon, and the credit card processing company CWIE for numerous allegations, which included unfair competition, copyright and trademark infringement, violation of the right of publicity;  and false advertising, amongst others.

The adult hosting site’s battle against Google ended in 2012 after a long and drawn-out eleven-year legal nightmare. Google was being sued over copyright infringements, including Google’s use of cached images. The case was dismissed despite ‘Perfect 10’ offering $25,000 to any person who could prove wrongdoing (which no one ever cashed in on).

Cheap Hosting Lawsuit Perfect 10 v. Google

Google was sued by Perfect ten back in 2001 when the adult hosting site requested a permanent injunction against Google to keep it from copying and distributing thumbnails of images from their magazine, as well as attempting to stop Google from linking to sites that illegally hosted Perfect 10 content.

The court initially agreed that Google should not be using the thumbnails. But later on, the Ninth Circuit Court of Appeals reversed the ruling. They said Google’s use of the thumbnails was “fair use.”

Perfect 10, unhappy with this ruling, fired back with various secondary liability claims. Most were supported by the Motion Picture Association of America (MPAA) and Recording Industry Association of America (RIAA), and of course, opposed by the digital rights group Electronic Frontier Foundation (EFF).

Eight gruelling years of legal battles and two unsuccessful requests for the Supreme Court to review the case, it moved to the District Court. Google and the adult hosting site pointed fingers at each other, claiming they were breaking the rules. And towards the end, Perfect 10 went the unconventional route to justice, releasing this plea for readers to help out:

“Perfect 10 is offering $25,000 to the person who provides us with the most compelling non-public evidence of Google’s illegal conduct between now and February 28,2012…” the public appeal stated.

It did not generate any evidence for the adult hosting site.

The End Of The Battle

Ultimately, Google and Perfect 10 agreed to dismiss the case with prejudice. A Google representative wouldn’t say if there were a behind-closed-doors settlement involved.

Why A Dismissal?

Why would the cheap hosting site agree to dismiss the case? It probably has something to do with the fact the court asked Perfect 10 to open its books, showing the court all communications within the company regarding the lawsuit. Was there something they wanted to hide? It is certainly possible.

No True End In Sight

Yes, Google and the adult hosting site have had the suit dismissed. However, the other suits are still going strong. Their other suits, copyright cases against companies like Amazon, Hot-file, Mega-upload, and more, are still going strong. They have added Yandex, Russia’s version of Google, to the list of defendants, as well as Tumbler.

What Can You Learn?

Google Perfect 10

Unless you are a search engine, not much, it is because Google is a search engine and not directly hosting the material that they were not found to violate copyright laws. The thumbnails on their image results page directly direct you to Perfect 10’s homepage.

You need to know this: ensure that all pictures and materials on your website are yours or that you’ve been granted permission to use the materials. You do not want to find yourself in court: it won’t be as easy as it was for Google.

Do you think Google should have been found guilty? Do you agree with the court’s decision?