How to view your cPanel Website stats
If you are a website owner, you surely want to inspect the number of visitors who visit your website hourly, daily, or monthly. For this purpose, cPanel has many built-in statistic information tools. cPanel comes with several ‘in-house’ premeditated tools that present the customers with comprehensive statistics/summaries of the visitors. One can even view detailed statistical data about his/her website, such as total number of hits, exceptional visits, visits per page and much more, on an hourly basis with the help of these built-in tools available in the cPanel account.
Steps to view your cPanel Website stats
To log in to your cPanel account, just enter the website ‘URL’ and add “/cpanel” at the end of the ‘URL’. Now, you will be taken to the login screen. Here, enter your web hosting username & password to access your cPanel.
The demo here assumes that the user has already logged in to his cPanel. So, let’s move on to viewing the website stats.
1) Once inside the cPanel, scroll down the page to spot the “Logs” Section. Click on the “Webalizer” icon under the Logs section. You will be taken to the “Webalizer Stats”. Webalizer is a multifaceted stats program that creates a range of graphs & charts on the subject of site visitors. Webalizer is the most commonly used tool that is comprehensible. Clicking on the “Webalizer” icon will fetch a catalogue of domains available in your cPanel. You may have one or more based on the intricacy of your website.

2) After this, select a specific domain and click the Magnifying Glass icon (‘View’ icon) on the right side of the field where you wish to view the stats. Now, you’ll be taken to the chief Webalizer page, where you can access ‘visitor stats’ divided in several ways. The chart given on the top is always color-coded. One can view the bottom chart to understand which colour represents which stat. As a rule, the principal is the “Visits” stat shaded in Yellyellowents, which shows the number of unique visitors visiting your site in a specific month. Hence, one can analyze usage stats for a particular month as well.

3) On the left of the bottom table, you can find a list of the months for the previous year (2012). Each link will offer you comprehensive stats for that particular month of the year. You can click on a specific month you wish to view in detail. In our case, July 2012 is selected. Now, click the “Hourly Website stats in cPanel” link at the top. Now, you can view the hourly stats for July 2012. You can also use the links at the top to steer through the wide-ranging catalogue of Website stats in cPanel. This wide-ranging list is really drawn out and contains not only statistics for the hits or Website stats in cPanel but also the breakdowns of specific files & pages which has got the majority of hits, details about the pages from which visitors have started and finished and the source of traffic for your website.


4) as an alternative, you can also view the ‘Analog stats’ instead of using the Webalizer. To do so, go to the home page and click on the Analog stats in the Logs section. Now, you will be taken to the Analog Stats page. In essence, Analog is quick and lightweight data that gives a simple summary of all the visitors to your website.

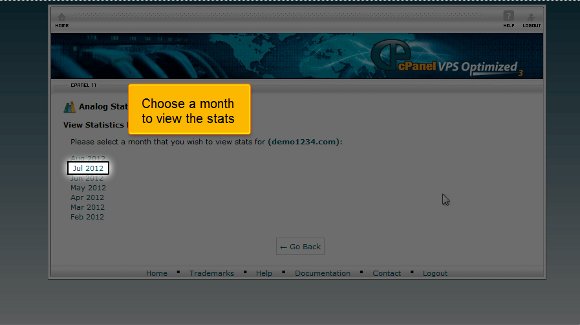
5) Click on ‘View’ to see view cPanel Website stats in cPanel sorted month-wise.
6) Now, select a specific month to view its stats. In our case, July 2012 is set. You will immediately be taken to the “Web Server Statistics” page. One can view the usage stats in several dissimilar ways from here.
7) Click on the “Daily Summary” button to view the cPanel Website stats summary daily

8) Another alternative is to download the “Raw Access Logs”. Go to the home page and click “Raw Access Logs” under the Logs section. Raw Access Logs help you observe the summary of visitors without providing charts, graphs or any other graphics. You can scrutinize the usage data with your personal data analysis application if you download these logs.

9) Now, click on the domain to begin the cPanel Website stats download process. A dialogue box will be opened now.

10) Click the “Save File” option and the the “‘OK”‘ button. All done! The cPanel Website states that data has been saved to the computer.

We have reached the end of the tutorial at this point. So, you have learned how to access your cPanel Website status and download how to access logs for further study.


You must be logged in to post a comment.