Xoops


The Process of Installing Xoops

Now, Fantastico is a reputed web hosting service provider that has been operating for years. Fantastico is very popular because it gives users applications that allow them to perform many different activities.

All the applications provided by Fantastico are pretty compatible with CPanel. Fantastico also provides several scripts that you can use to install the applications smoothly.

Installing Xoops is relatively easy, provided you follow the correct procedure. Now, if you are looking for a tutorial to guide you through the entire process, you have found the proper tutorial. This tutorial is broken down into a series of steps that are very easy to follow.

So, now let us understand the steps you must follow to install Xoops. You must follow the steps in the tutorial below in the same order.

1. To start the installation process, locate a tab that says Xoops. Once you find it, you have to click on it without fail.

xoops

2. After you click on the tab Xoops, you will be taken to the installation screen of Xoops, and on that screen, you must click on the new installation.

xoops

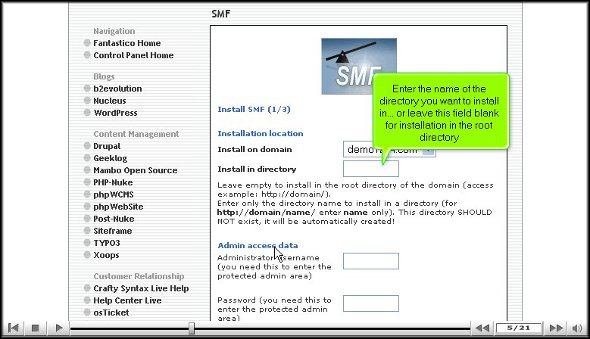
3. After you click on the new installation, you will be taken to yet another screen where you must type in a name for a directory in which you want to install Xoops.

xoops

4. On this same page, you have to provide a name for the admin and a password

5. For the base configuration, you must provide a slogan for your website and an email address.

xoops

6. When you are done with the above steps, you can click on Install Xoops

xoops

7. To complete the installation process, you must click on Finish.

xoops

This brings us to the end of the tutorial. So now you can use the username and the password to log in to the application. Now, when you are going through the various tools on the application, you must take your time to go through each of them carefully. If you rush through the process, you may miss certain essential things. You may also consult some other tutorials that will teach you the various functions of the tool present in the application.

As a user, you may have a bit of trouble using the application, but the best way is to keep calm and go through the application’s various features. After spending time with the application, you can start configuring the settings per your requirements.

You may have realized by now that Xoops is quite a practical application with many benefits, so you must install it properly to get the best out of it. Following the steps in this tutorial, you can install the application properly.

Go to the top of the page. Back to the tutorial

TikiWiki


How To Install TikiWiki without facing any problems

Now, TikiWiki is not a very difficult application to install on the computer. All you have to do is follow the steps mentioned in the tutorial, and you will face no problem. TikiWiki is a beautiful application by Fantastico, a reliable web hosting service provider.

All the applications provided by Fantastic are straightforward to use and handle. These applications are pretty compatible with cPanel. Fantastico provides handy scripts that make the application process easy and less time-consuming.

Let us look at the steps you must follow while installing TikiWiki on your computer. Since you are going through this tutorial, you already know how to use Fantastico’s interface.

1. To start the process, you will have to click on TikiWiki

tikiwiki

2. Once you have clicked on this tab, you will be taken to an installation screen and have to click “new installation.”

tikiwiki

3. After that, you will be taken to another screen where you must type in the name of the directory where you wish to install TikiWiki.

tikiwiki

4. After completing the above, you can click install TikiWiki.

tikiwiki

5. To complete the installation process, you must click on finish.

tikiwiki

With this, we have reached the end of the tutorial. Now, you can use the admin name and password to log into your account. This application has many features and tools that can let you perform various activities. It would be best to go through the application interface to learn how to use it well. It would be wise not to rush through the installation process as you will miss out on the essential aspects of the application. You may consult some other tutorials to learn about the various tools and their usage,

If you happen to be a new user, you may find it a little tricky to go about the interface, but once you spend a little time, things will work out just fine. Together, you will need to have a lot of patience and stay calm. The best part about this application is that you can tweak certain features as per your requirements, so once you are confident about it, you can start configuring the settings. Once you start using this application, you will notice a drastic change in the performance of your website within a short period.

So you understand that TikiWiki is a handy application provided by Fantastico, so to bring out the best from the application, it has to be installed correctly. So, ensure you do exactly as mentioned in the tutorial to complete the process correctly.

Go to the top of the page. Back to the tutorial

Support Service Manager


How to install Support Service Manager

If you are having difficulty installing Support Service Manager, that is only because you may not have followed a proper procedure. Well, this tutorial will help by guiding you through the entire process. Support Service Manager is a helpful application by Fantastico, a reliable web hosting service provider. The company has been around for many years, providing users with valuable applications. The applications provided by Fantastico are straightforward to handle and equally easy to install on the computer. All the applications can be used with cPanel.

Fantastico has a beautiful stock of scripts that will let you install the applications easily on your computer. These scripts also help you to save a lot of time. This tutorial has been broken down into easy-to-follow steps to make things easier.
The steps to install Support Service Manager on your computer can be listed below.

1. To start the installation process, locate a tab that says Support Service Manager.

Support Service Manager

2. Once you locate this tab, you must click on it; you will be taken to an installation screen where you will have to click on a link that says new installation.

support service manager

3. After you have clicked on the new installation, you will again be taken to another screen where you will have to mention the directory where you want the building to take place. You also have the option of installing the application in the root directory.

Support service manager

4. On this same page, you must assign a name to the admin and provide a strong password.

support Service manager

5. To begin the installation, you will have to click on Install Support Service Manager.

Support Service Manager

6. To complete the installation process, you must click on finish.

Support Service Manager

This is the end of the tutorial, and if you have followed the steps mentioned above in the proper order, you have successfully installed the application properly. To learn how to use the software properly, you should start exploring the tools and features that come with this application. Now, you can know how to do many things if you spend time with the application. However, you must not rush through the learning process, as you may miss out on some crucial aspects of the application.

As a new user, you may face application problems, but the best way to overcome such difficulties is to keep a cool head and relax. You can consult other tutorials to understand how to use the tools in this application. Once you feel confident about the application, you can start configuring the settings of the application to suit your purpose. You must install this application immediately without hesitation to get the best out of this application. This application is handy; as a user, you will experience tremendous improvement in your operations.

As the world becomes a global village, international trade becomes more popular and competitive. Multinational companies are growing fast, leading to the development of society as a whole. Maintaining good interaction between all branches becomes more vital as these companies grow and expand. Our computer systems, internet, and allied services like voice conferencing and video conferencing make this possible. While using these features, you will often encounter software glitches and hardware faults that a technical expert can solve. The more we depend on these technical features, the more the need for technical support increases. The support service manager helps you accomplish these tasks.

Support Service Manager is an application script proven to be a master solution to all your technical problems. Often, multinational companies outsource their technical support to a third-party vendor. These third-party vendors may be located in any part of the world. When an employee or user, as referred to in general terms, faces a software glitch or a hardware issue, they raise tickets via the Support Service Manager, and the technical experts get the same through emails. The Support Service Manager is often synchronized with the knowledge base, providing users online support. They can refer to this knowledge base and solve their issues instantly. It is a beautiful support application for translating ticketing matters and sending administrative support.

Go to the top of the page. Back to the tutorial.

SMF


Install SMF in the fastest way possible.

Fantastico has been around for many years, providing users with valuable applications to facilitate smooth operations related to web hosting. SMF is a classic example of such a helpful application. Now Fantastico is a very reputed company that has become popular worldwide.

The applications provided by the company are straightforward to use. Fantastico has a good stock of scripts, and these scripts make the installation process less time-consuming. The best part is that these applications are compatible with Cpanel. Now, if you have spent much time looking for a tutorial on installing SMF, you have certainly stumbled upon the proper tutorial.

This tutorial is just perfect for those people who are new to SMF. The tutorial will guide you through the installation period, divided into simple and systematic steps.

Now that you are reading this tutorial, it can be assumed that you already know how to use the Fantastico interface.

1. you must locate a tab that says SMF in that list. Once you find that tab, you will have to click on it.

SMF

2. After that, an installation screen will appear; on this screen, you must click on a link that says new installation.

SMF

3. Once you finish the abovementioned step, you will be directed to another screen where you must note the directory in which you want to install SMF.

SMF

4. On the same screen, you must specify a username for the admin and mention a password.

SMF

5. To start the installation procedure, click Install SMF.

SMF

6. To complete the installation of SMF, you must click on finish.

SMF

This brings us to the end of the tutorial. Now, you can take the time to look at all this application’s different features and tools. Now, you must learn the application in such a way that you absorb each aspect of the application well. So you see that if you rush the process knowing, you will miss out on a lot. As a new user, you will have some trouble figuring out the use of specific tools in the application, but once you spend a little time with the application, things will be better.

The good part about this application is that certain features can be tweaked per users’ requirements. So, if you need to change specific tools’ settings or features, you can proceed. There are various tutorials on how to use this application, and you can consult them without any problem.

Go to the top of the page. Back to the tutorial

cPanel Login


How To Use cPanel Login

Most hosting companies provide an interface to allow end users to manage allocated resources. cPanel is one such Control Panel.

With cPanel, users can access control panel functions without worrying about anything else. cPanel is a fully automated graphics tool offered to users to help manage all resources offered. cPanel is for server administrators, hosting resellers, and end users.

GUI (Graphical User Interface) is one part of cPanel that provides users with extreme ease of use. Here’s how to access cPanel functions:

1) cPanel Login: A cPanel URL is usually emailed to you after signing up with a web hosting company. To use this URL, open the email and click on the URL (this could be a company’s domain name or IP address ending with either 2083 or 2087). The best way to access a control panel is to simply add a /cpanel to the end of your domain name. This will work once domain name servers are propagated.

2) cPanel Login: Press enter and wait for the browser to load the page.

3) cPanel Login: Now, a page asks you to log in with your user name. Very carefully put your user name into the space provided.

username cPanel Login

4) cPanel Login: Right under this, you will see a small box asking you to enter your password. Typed characters won’t be displayed due to security reasons.

password

5) cPanel Login: Scroll down to the trim tab that allows you to log into your cPanel account.

login-now

Viola! Now, you can see your cPanel interface. Now, you can immediately start accessing databases, setting up email addresses, managing shopping carts, and much more! Take your time to go through the numerous tables that are part of your cPanel. This will help you familiarize yourself with cPanel and all of its offerings. That’s it!

cpanel-view
logout

So, how do you log out of the cPanel interface? Simply click the logout button (usually at the top of the page). As you can see, cPanel is easy to use and figure out, and you’ll get the hang of it in no time! Let us know if you have any questions!